Showing posts with label Quilting. Show all posts

Saturday, January 8, 2011

Latest Project

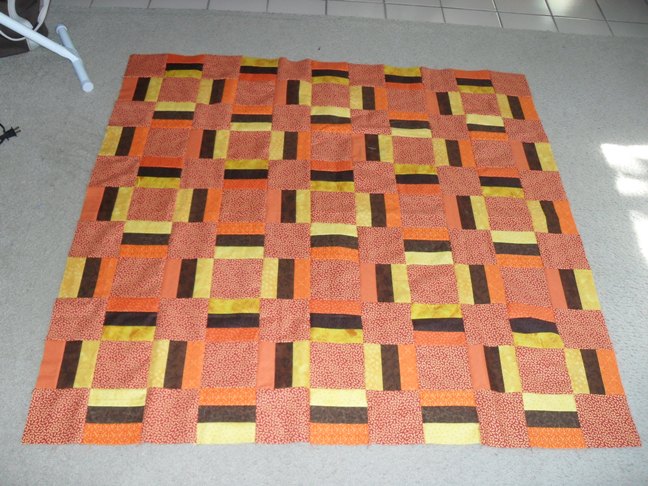
I know it's been a while since I posted, and there's stuff to say, but right now I just want to post a couple pictures of my latest project.  It's going to be a blanket to cover our fireplace and make it a gentler bump for David when he's exploring.

I started with these materials:

 Here's the top:
 Here's a close up of the quilting in progress.  The middle seam hasn't been done yet - it will be the same pattern, but with green thread.

I finally finished the quilting today.  I need to cut the binding and sew it on.  Not sure when I'll get it done, but I'm excited it's almost there.

I'll try to post another time how I made the design - I think it's pretty easy. 

Tuesday, November 9, 2010

Finished Quilt!

I just realized that I never posted pictures of my (long finished) quilt.  So here goes.

 Above is a picture where you can see the backing fall leaves material and you can also see a bit of the stitch in the ditch type quilting I did.

This one shows off the cool stitching I used to tack down the binding.  You can't see it in the picture on the front, but you can on the back.

After I finished the fall quilt, I tried some free motion quilting with a blanket just made of two pieces of flannel.  You can see it below.


 The close up shows another cool stitching the binding down choice, along with my first attempts at free motion.  It was much more fun than it was pretty, but I'm up for another try!
 Just another detailed look.

I've put my good sewing machine away while I help the girls make curtains for their rooms.  This is turning out to require a lot more patience than I have.  I'll get some pictures of those projects next time we work on them.

Sunday, October 17, 2010

Day 5 - The Top is Done

Hassani was busy at soccer today, and let's face it, that means I had time to sew.  I got the blocks pieced together.  You can see it in the picture above, along with the possible border materials.  That's right, I changed my mind.  Once I had it pieced together and held the leaves material next to it, I decided that the combo would be way to busy.  Since I'm trying hard to avoid the "Autumn Threw Up" feel with this quilt, I did a quick rearrange and recalculate.  The excel spreadsheet I'd used to plan the orginal pattern came in very handy.  I used to see what sizes of borders I could make with the existing material. I considered a couple differnt combos and settled on a near-solid-red border on the inside:

Then next border is made of the red patterned material.  I got it cut and sewed on, but ran out of time before I could iron and take a picture.  So, the quilt top is done - picture coming soon.  I also cut and ironed the binding, which is the same near-solid-red material.  Next up, the quilt back.  It will either be all all leaves, or perhaps leaves with a strip of colors from the front.  So many possibilities!

However, there's a competing project on the horizon... Gladys' room is up to be painted this week and may interrupt the quilt for a few days.

Day 4 - Late Night

After everyone else went to bed, I stayed up and did some sewing!  I got all the rows pieced and then started sewing them to each other.  So here is the quilt top, about 3/4 done.

Saturday, October 16, 2010

Day 4 - A Couple More Rows

I've got the 4 different rows in the quilt laid out.  They just repeat for the rest of the quilt.  I also got all the rest of the first rows laid out - these are the ones the spacing was messed up on, so I tried to sew them a little tighter.  I'm hoping to get more time tonight and see how far I can get.

Day 4

I got a few minutes to quilt today and mangaed to put together the first two rows.  Overall, it's really good.  I've got two issues, though. 
1.)  the blocks on my top row weren't exactly even.  The reds were a little bigger than the pieced blocks.  The second row was fine, so I'm guessing the pieced blocks on the top row are a little small.  I double seamed a few places on the top row, making the seam a little bigger than 1/4" in order to make them line up.  I'm going to think about this when I put in the next rows.

2.) I find myself wishing my red blocks were more solid red and less print.  I think it will be better when I get the whole thing together.  This is what happens when I change my pattern after buying my material.  The red print would make and AWESOME border for this quilt.  A little less awesome as a block.  I think the red wavy/near solid red material I'm going to use as a border would have made better blocks, but I didn't have enough of it, and wasn't willing to trek back to Lawrence to buy more.  So, we shall see.


While I was sewing today I stopped to take a couple pictures of one of my favorite features of my new sewing machine.  If you look at the silver foot on the machine, you can see a black edge on the right side.  This edge limits how far you can push the material past the edge of the foot, making a perfect 1/4" seam.  I used to use a post it note stuck to my machine.  This makes consistent seams so easy!

This picture shows my other favorite feature.  The top button pictured is the cut thread button.  That's right, my machine cuts the threads at the touch of a button.  It still gives me a little thrill every time I push it!  Many, many, many thanks to my mom for finding this machine and buying it for me for my birthday, Christmas, and occasions for years to come!  Mom, I think of you every time I use it, and I can't wait till we can sew together!


Days 2 & 3 - Blocks Cut, Old Quilt Patched

So, after I posted about Days 1 & 2, I actually did some more sewing and cutting and ended up with all my strip sets sewn together and cut into blocks.

Then, after cutting them out, I still wanted to quilt more.  But it was late, and I knew my next step involved laying the whole quilt out for a preview look and I wasn't ready to do that.  So I did a little quilt repair instead.

I started this quilt with my first sewing machine over 10 years ago.  I never did finish it.  I cut the blocks, or maybe just sewed the strip sets and stalled out.  So my mom finished it as a gift to me a couple years ago.  I love it!  Love, love, love this quilt!  Very special because of the team work between me and my mom, I think.  Anyway, it's seen a LOT of hard use.  It's a "floor quilt" at my house.  That means we use it as a throw rug in the living room.  David lives, plays, leaks milk (and other fluids) on this blanket.  It probably gets washed at least twice per week.  And it shows.  In fact, it had a couple holes on the top that I think were just spots the material plain wore out from all the washing!  So I asked my mom to bring me any scrap material she had left over from it.   I freehand cut some "squares" and sewed them on as patches.  Regrettably, I was too lazy to change thread from the orange I was using for the fall quilt.  I thought it would blend.  I was wrong. 

It's amazing how much the fabric has faded.  I don't think I'll be able to keep up with the wear at this point, and I'm tempted to retire it from hard use. But I love seeing it every day.   I'll probably just keep using and patching it.

Oh, and Day 3 - nothing on the quilt.  But the kids were off school and we fit in a trip for David's lab work, a book store trip, lunch with Dad, the zoo, buyinging pumpkins, a candy run, and a family movie night.  Perhaps the quilt will get a little more attention today, Day 4.

Thursday, October 14, 2010

Fall Quilt - Days 1 and 2

I'm making a fall quilt!  It's going to be a floor quilt to use in the living room where David hangs out.  When my mom and aunt were here and we went on a quilt shop hop, I picked up material to use with a pattern my aunt had. 

You can see the material in the picture above.  The yellows, oranges, and browns are fat quarters.  The red/yellow/orange print and the red material were bought for borders, and the leaves material for the backing.

But I don't like doing things by a pattern.  I like to make my own pattern.  I really like symmetry, too.  So, what started out as an easy quilt pattern with big blocks has turned into this:

I used an Excel spreadsheet to experiment with some different patterns.  I saw a picture of a quilt with this pattern and liked it, so I made up a pattern to match and for use with my materials.  The print that was supposed to go for a large border became the 83 red squares in the pattern at left.  The 12 fat quarters of red, orange, and yellows - all different prints - are used in rail fence sort of block.  The blocks are arranged to frame the red squares. 

I did a lot of math to figure out if I had enough material to make the pattern change.  In the end, the fat quarters and the red print are going in the middle of the quilt, as shown in my pattern.  I mapped out an arrangement that uses the fat quarters symmetrically throughout the quilt.  Using that layout, I only need 4 different rail fence blocks.  That simplified things for me.  The nearly solid red will now be a skinny inner border and binding.  The leaf material from the back will now also be a ~4" border in the front. 


Once I knew it was going to work out - I didn't even have to buy more material! - I was anxious to get started.  First I cut my fat quarters into 2" strips.  I used my strip cutter, which I LOVE.   At my mom's suggestion, I put the strips in Ziplocs according to which of the 4 different types they will be. 

Then today, Day 2, I cut the 83 squares (5x5") from the red print and bagged them.  I had more time, so I started sewing the strips together.  Of the four different block types, I got two of the sets of strips sewn together.  I love the way the strip sets look the same at first glance, but on closer look you see they are made of different materials.

I'm really in the mood to just keep going.  Next up is to sew the other two strip sets.  Then I'll cut all the strip sets into 5x5" blocks.  Then I'll get to arrange the blocks and see if all of my calculations were correct.   However, the kids are out of school tomorrow, and their patience and level of self entertainment will not allow me to quilt while they are here.  I'm trying to think of fun things to do with them (pumpkin patch?  zoo?)  and not be quilt-cranky.  (But maybe after they go to bed tonight...)

Friday, October 9, 2009

Quilt Finished!

It is finished! This is the front.

This is the back. Not nearly as lopsided as I thought it would be, but a bit off center.

Here's a shot showing the corner detail. It's about 45"x57", what we call a TV blanket at my house, or a lap quilt I suppose.
Now that the quilt is done I will rejoin my regularly scheduled life!

Thursday, October 8, 2009

Wednesday Night & Thursday Day Quilting


So here I am on Wednesday night hand tieing the quilt. Except when I was done with it I didn't like it. And it bothered me. And the back was very crooked to the front. And I was going to have to do a LOT of trimming to make it work. And I didn't like it. And that bothered me. I felt like I ruined my quilt.
So I got the kids off to school this morning and came home and looked at the quilt. Then I did some testing with some scraps and tried machine quilting. It looked like my machine and I would be able to handle it, so I carefully cut out all the ties I'd done. And I carefully repositioned the top, batting, and back. I carefully pinned. And I even more carefully machine quilted. And the front looks GREAT!


And the back... well, it doesn't look too bad in this picture.

There are a couple of puckers. But the big deal is that the back is shifted from the front. I'm not sure how that happened. But now I understand why every other quilt I've seen has a solid back. I'll post finished pictures when I'm done. I'm hoping to trim and bind tonight!

Wednesday, October 7, 2009

Wednesday Day Quilting

This morning after dropping D off at preschool I went straight to the fabric store and bought sewing machine needles, black thread and some batting. Then I came home and did this:


First border around pieced front - tiny red strip.

Then I put on the 2nd and final border for the top. That's when I measured the top and realized it's an inch bigger than the batting I bought. By then I'd already emailed my mom about the batting and had almost talked myself into returning it anyway, so now I'll return it for sure. This time the batting will be bigger and NOT fusible.

After finishing the front I moved on to the back. I had a big chunk of red fabric. I trimmed off pieces to made a binding strip for it. (Let's hope I measured correctly...) and then I was left with a piece about as big as the pieced part of the front. I have 3 sets of strips to sew around that red chunk to make the back. The first strip is silver. I got that one finished just before I had to leave to go get kids from school.


This picture is the back laying centered on top of the top. This would have been my first choice of backing, but I'm out of black material and don't want to buy more. Actually, my true first choice would have been to just use one piece of material for the back, but I don't want to have to buy more, so I'm piecing strips. I think this part is pretty fun and it's going fast. I've got two more strip/rounds on the back and then on to batting and binding and tying/quilting.

Tuesday, October 6, 2009

Tuesday Night Quilting


I sewed the squares together. Then I sewed the groups of two together to make 4 square blocks.
Here are the blocks of 4 layed out.


Then with much thought and more attention to detail than I thought I had I sewed them all together.

Here's a shot where you can see that I rocked out the corners. They are not perfect, but you have to look pretty close to see which ones are off a bit. (This was the part I was most worried about!)


Here's a look at the border I planned out. Much to my surprise, when I measured the quilt top and looked at my leftover materials, I have enough to make a big border and back the quilt! Here's the front border pictured. I mini strip of red paws and a wide strip of black. The back will be mostly the red plaid with a wide border of silver and then strips of black (using up the extras I cut). The binding will be the red material again.


Here's my trial strip of the red mini strip. On the quilt it will be between the quilt top and the black material. I just wanted to see how it would look sewn up. Good enough, I think.
I'm excited to get it done! I'm going to stop by the fabric store tomorrow and get the batting (and more thread and other general supplies) then come home and sew, sew, sew. I'd start tonight, but I'm tired enough that I'll make dumb mistakes and I don't have extra material!!
(Posted after midnight, in the hopes that my mom will look first thing in the morning! Love you, mom!)


Busy Monday & Tuesday Quilting


I was excited to have my sewing machine back on Monday, but ended up having a very busy day full of everything BUT sewing. I got a few strips sewn together and then finished the strips Tuesday morning.
Much to my frustration, when I measured closely, the strips varied from 6 1/4" to 6 1/2". Ugh. They were supposed to be 6 1/2. The majority of the places I measured the strips they were 6 3/8". So I was supposed to cut 6 1/2" squares and I changed that to 6 3/8" squares. It's all pieced squares, so I should be able to get away with that. My plan is to make 4 square blocks and measure again and see where I'm at.

This bottom picture is the squares all cut, and some of them laid out in the pattern of the quilt. I'm going to go tuck Gladys in and do some more sewing. Tony got a new guitar and is really wanting to play it, so I'm excused from being social for the night. :)

Friday, October 2, 2009

Cutting is done

I had a very productive morning! I even took pictures. Sharing here will save Tony from a play by play tonight. :)

Here you can see the strips I cut that I'll sew together to make the blocks for the quilt. (I am without sewing machine for the weekend, so this project is on hold until Monday...)
Notice there are two piles of black strips. After I cut out my "8 strips of dark material" I realized that I had the black folded in half... so I made two strips with every cut. I'll have to find a use for the extras.
Also, the new rotary cutter was totally worth it! And thanks to my mom, because she taught me how to use a rotary cutter a looooong time ago, and it all came back to me.

So here is the pattern I'm using. I was going to go for a rail fence, but changed my mind this morning and decided this would be more fun. We'll see how it turns out. I'm not noted for color selection.


Looking at the pattern, all of the middles of the boxes will be silver. The horizontal strips will be the red print and the vertical strips will be the black print.


Here is where I say "Never Again". Never again will I buy something so fussy to cut. Well, ok, if it turns out looking awesome, then it maybe was worth it. Cutting out the red strips, with little paw prints down the middle (school mascot is a panther) was a very time consuming task. I think the red alone took twice as long as the black and sliver together. Still, it looks good!


This is my scrap from cutting the red strips. They are less than an inch across, but I think I will find a use for them. Maybe in the border. I've never been one to follow a pattern 100%, and I think the border will be another deviation.
So, I'll be back on Monday with some sewing, I hope!

A Quilt Story


Many, many years ago I started a simple quilt and never did finish it. I asked my mom to finish it for a birthday, which she did, of course. (And she did a wonderful job, too.) Anyway, I pretty much thought that was the end of my quilting career.


Then my mom and my aunt came down and I took them to some quilt shops. Picked out material for another quilt I want my mom to make for me. :) And I kind of got the quilting bug. So I made a couple of pillows.


And I really liked it! So quilting, in small doses at least, has proven to be very fun.


Then I remembered the school carnival coming up. And I decided... hey, wouldn't it be great to donate a fabulous quilt for them to give away? So yesterday I rushed around after Jazzercise to squeeze in a quick trip to JoAnn Fabrics before I picked Zeke up from school. I got the material then, and ended up going back with David in the afternoon and picking up a rotary cutter kit (with my 40% off coupon, thank you very much!). So I'm all set and hoping to get all my cutting done today!

(I don't understand the spacing issues going on, so my appologies for the funky layout today!)